
Custom backgrounds on the J series phones are very easy. It requires settings to be placed in the 46xxsettings.txt file located on the root of the IP Office’s HTTP server. It is advised that this file stay auto-generated. At the bottom of the file is a line that includes the 46xxspecials.txt file. This is where we will make our customization.
One thing to keep in mind is that the image resolution MUST be 320×240 otherwise it will not work.
Parameters
The lines that need to be added are:
| Parameter | Options | Example |
| BACKGROUND_IMAGE | Format: jpeg
Max size 256KB Resolution 320×240 Use comma seperated for multiple Max 5 |
SET BACKGROUND_IMAGE pic.jpg |
| BACKGROUND_IMAGE_DISPLAY | Which file above should be displayed by default | SET BACKGROUND_IMAGE_DISPLAY pic.jpg |
| BACKGROUND_IMAGE_SELECTABLE | If the user can change their background 1=yes, 0=no | SET BACKGROUND_IMAGE_SELECTABLE 1 |
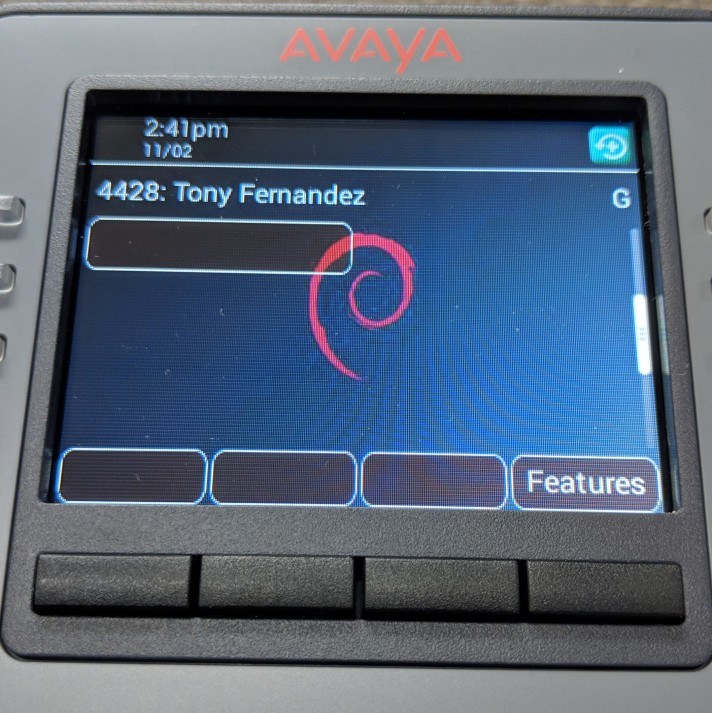
Example file:
SET BACKGROUND_IMAGE debian.jpg
SET BACKGROUND_IMAGE_DISPLAY debian.jpg
SET BACKGROUND_IMAGE_SELECTABLE 1
Very helpful Tony, Thank you.
Any idea how to get the customized image to appear on the J100 expansion module?
LikeLike
Hi Jim, I’m glad you found it useful!
As for the J100 expansion module. I’m assuming you are referring to the new JEM expansion modules. Unfortunately it is not possible to upload a custom image to them. In the “Using Avaya J100 Expansion Module for SIP” documentation on page 14 it states:
“If a custom background image is selected for Avaya J169/J179 IP Phone, the expansion module displays default image 1 (“Red”).”
Hopefully we’ll have this in the future. Thanks for the comment.
LikeLike
Hi Tony. Thanks for this post. I’m looking to do this on my J169s. However, if file stays auto-generated, I assume I’ll have to continually go in and add these lines whenever the 46xxsettings file auto-generates again?
LikeLike
Hi Rob thanks for the comment. What you’ll want to do is not actually edit the 46xxsettings file but instead make the exact same changes in the 46xxspecials.txt file.
The 46xxsettings when auto-generated has a line at the end to include the 46xxspecials file. 46xxspecials won’t be auto-generated and your config will stay there permanently even of the 46xxsettings is regenerated.
Hope that help!
P.S. the 46xxspecials.txt file is placed in the System/Primary folder.
LikeLike
Thanks Tony! There’s not currently a 46xxspecials.txt file in that folder. Do I just need to create a 46xxspecials.txt file and put those 3 lines of code in it?
LikeLike
A few other questions…
I need to:
1. Create 46xxspecials.txt file containing only the 3 lines of code and place the file in the System/Primary folder.
2. Place the .jpg file in the System/Primary folder.
3. Reboot the phone and go to Settings > Display > Background > and see the option there? I’m currently still seeing the Default image 1: (Red), Default image 2: (Dark), etc. (6 default images). Does this mean my system is running the J100 expansion module? How do I determine that?
Thanks for all of your help!!
LikeLike
Hi Rob. Your steps look good however you may need to check the following and let me know.
1. First verify that the 46xxsettings.txt has the 46xxspecials.txt included at the bottom. It will be the last line and it will say: “GET 46xxspecials.txt” without the quotes.
2. Verify that your file is indeed the correct size, otherwise you may not see it on the list.
3. Try to manually browse to the image to verify that it is accessible via http. Meaning navigate to https:///pic.jpg and your web browser should download the image.
Let me know if those steps work otherwise we can keep troubleshooting.
LikeLike
Ah… for #2 the answer is yes, and #3 it is accessible via http.
But issue is #1. It has a lot of IF $MODEL4 _ statements for all kinds of models. There is a line for the 46xxspecials.txt file but it’s under a model different than J169. That’s the only time the file is called in the 46xxsettings file.
Any suggestions?
LikeLike
Can you verify if you see “GET 46xxspecials.txt” at the bottom? If not, try adding the following Source Number to the User called “NoUser”.
CODE:
ENABLE_46XXSPECIALS_TXT
LikeLike
I’ve verified it’s not at the bottom. I’ve added “ENABLE_46XXSPECIAL_TXT” (no quotes) as a Source Number to the “NoUser” user. Now just wait for a new 46xxsettings.txt to auto-generate?
LikeLike
The file will auto-generate whenever the file is requested. So you don’t see the GET part anywhere in your 46xxsettings?
Can you confirm if you see the file in your system/primary folder? You shouldn’t see it there.
LikeLike
The GET part was only in a section of code for a model different than the J169. There was no other 46xxspecials GET call in the code. There was no 46xxspecials.txt file in the system/primary folder either, but I created one and uploaded it earlier in the week with the code you suggested to put in it.
LikeLike
Did it work when you uploaded the file with the parameters I have in my post? Did you verify the correct dimensions of the file? If you’d like you can send me both and I can take a look.
LikeLike
I am by no means a phone guy. Is there a way to test this on a single phone or two? It would be my office phone and my test phone.
LikeLike
Hi Raul, you definitely can and I’ll give you two ways.
Method 1: Exclude the “BACKGROUND_IMAGE_DISPLAY” from the 46xx file. This parameter sets the default image to be selected. If not set then you should have the default and be able to select the image in the menus (provided you have “BACKGROUND_IMAGE_SELECTABLE” set to 1).
Method 2: It’s a bit more complicated however you can use groups. This can also be used to give users from group 1 and users from group 2 different images. See below for your entry in 46xx
IF $GROUP SEQ 1 goto CHEVROLET
IF $GROUP SEQ 2 goto FORD
# CHEVROLET
{specify settings unique to Chevrolet Group}
goto END
# FORD
{specify settings unique to Ford Group}
# END
Then, in the phones you can set the group in the CRAFT menu. You can use this method to set a wallpaper for only users in group 1 for example along with any other settings specific to that group.
Let me know if that helps either way
Best of luck
LikeLike
Ok, weird question but how do I get to this 46xx file? We use Avaya IP Office. I’m really scared to mess something that will cripple the entire organization. I just want to be cautious.
LikeLike
No problem. So the 46xxsettings file doesnt exist by default. The file is aut-generated every time that you request it. For example opening your web browser and going to http:///46xxsettings.txt will “request” the file.
The 46xxsettings file can be uploaded to the root of the IP Office file system however what you’ll actually wanna do is create a 46xxspecials.txt file and upload that. Hopefully that is understandable. Either way below are some steps of what you should try out. And on another note, dont be worried about making these changes. You can always just delete the file and things will go back to normal.
Steps:
1. Open notepad on your computer and create a 46xxspecials.txt file
2. Add any of the programming you’d like to add for the wallpaper or whatever else you’d like to add
3. Open IP Office Manager and login
4. Go to File>Advanced>Embedded File Management
5. Login again
6. Navigate to Disk>System>Primary
7. Verify that there is no 46xxspecials.txt file already in the file list
8. Upload your newly created file
LikeLike
Hey Tony! I’ve followed your steps and am racking my brain with this one. It should be pretty straight forward…. I added the 3 lines of code to the a new 46xxspecial.txt file as i’m using IPOffice and its auto generated. I uploaded a 250×187 .jpg image that is 15kb along with the specials file to the primary folder. using http://xxx.xxx.xxx.xxx/oc1.jpg and http://xxx.xxx.xxx.xxx/46xxspecials.txt I can navigate to my picture and the uploaded special file so they’re both there and accessible. And at the end of my 46xxsettings.txt I have the required Get 46xxspecials.txt code. Any suggestions of where to head or what I might be missing? Thanks!
LikeLike
Hi Ed,
Thanks for the comment. That seems strange since both the image and the txt file appear to be accessible as well as the txt file is correct.
You say that your image is 250×187. Have you tried with am image that is 320×240? It’s possible that the image might need to be that even though my blog post says 320×240 is the max resolution.
Let me know! 🙂
LikeLiked by 1 person
That did it! Thanks for then help. Crazy I worked on this back and forth and back and forth and never thought of trying that! Apparently that’s not the max that’s the actual.
LikeLike
that’s awesome! Glad to hear it. Thanks for stopping by
LikeLike
0 Pingbacks
Top Posts & Pages