

Intro
My goal here is to have one primary server (S1) that is running my VM and a secondary server (S2) that is in standby in the event that S1 fails. Consider this a poor man’s backup strategy however a valid strategy of you are on a budget as well as can deal with some data loss.
How it works
The solution is simple. S1 will replicate the VM’s hard drive to S2’s storage. There are a few requirements however.
- Both servers must be a part of a cluster
- ZFS storage must be used instead of lvm (other options also exist outside the scope of this post)
- ZFS Pools must have the same name
- The network connection must be reliable
Clustering
S1 Setup
To setup the cluster, log into S1’s web interface which can be found at https://<ip-address>:8006/
From the left menu click Datacenter and in the center pane click Cluster.
Click Create Cluster.
Enter a cluster name (no spaces allowed and select your Link 0 and optionally your Link 1 for redundancy. Click Create.
The Task viewer window should pop up and you will know it is complete when you see TASK OK. You can click the x.
Click Join Information and copy the Join Information string.
S2 Setup
Log into S2’s web interface and go to the same Cluster section. This time click Join Cluster.
Paste in the Join Information string you have from the end of the previous step, enter the root password, select your Link 0 interface and click Join.
You will see a Task viewer window appear. You may not see any output in this window which in my lab was perfectly fine. You will however see the cluster formed in the web interface of S1. When you see this you can click the x button in that window of S2.
ZFS
ZFS goes a bit out of the scope of this post since you can configure it however you’d like. For example you may want to configure your disks in a mirror or one of the raidz options. You can use the link here to show you some more options however I will use a basic ZFS disk in my example.
S1 & S2 Creating ZFS Pools
The steps below need to be completed on both S1 and S2.
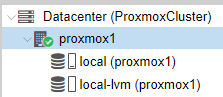
Log into S1’s web interface and under your Datacenter click proxmox1 or whatever you named it.
In the top right click 
Log into the Linux shell using your root account.
I will be using /dev/sdb as my ZFS drive.
Start by deleting all partitions on the drive.
WARNING: Be careful as you could potentially experience data loss if you are not entering these commands against the correct drive.
Enter fdisk on /dev/sdb:
$ fdisk /dev/sdb
Type p to view the partitions.
Type d to delete a partition. (You will need to select the partition after entering d.)
Type w to write/save your changes.
You can create the zpool by entering the command:
$ zpool create -o ashift=12 zfs-pool /dev/sdb
Set the pool to use compression by entering the command:
$ zfs set compression=lz4 zfs-pool
You can then view your new pool by entering the command:
$ zpool status
You should now see your zfs-pool in Datacenter>proxmox1>Disks>ZFS.
Datacenter ZFS Storage
Next we need to configure our ZFS pool as a Storage Repository (SR) within the Datacenter Cluster.
Click Datacenter and in the center pane click Storage.
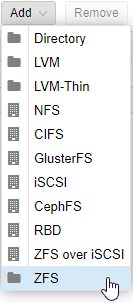
Next click Add and select ZFS.
In the next window enter an ID which you can name what you’d like. I named mine zfs-storage.
Select the zfs pool we created and then click Add.
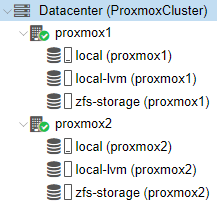
In about 15 seconds you will see your new SR created under your proxmox nodes.
Virtual Machines
As you can see from the screenshot I do not have any VMs. Create a VM however be sure to set the Hard Disk paramenters below.
The VM will be using is a simple Ubuntu file server.
Hard Disk
Storage: zfs-storage
Disk size (GiB): set the size your application requires
Replication
Setting up replication is simple. Go to your VM on the left hand pane and in the center pane select Replication. Click Add.
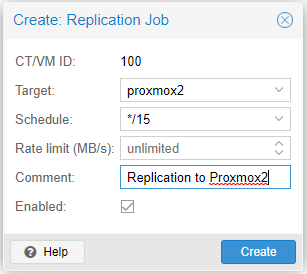
The Create: Replication Job window will appear. You’ll need to set the following:
Target: proxmox2
Schedule: whatever time frame you want to replicate over the data. The formatting can be found here.
Rate Limit: can be left blank unless you have a need to limit the transfer speed.
Comment: Optional
Enabled: checked. Obviously.
Now after clicking create wait some time for the replication to complete. The first time (depending on hard drive size) can take long. Subsequent replication tasks should be quick since only the changes are replicated.
You should see a loading wheel while the replication is happening: 
While you are waiting I wanted to mention that the secondary VM on S2 should be created to not turn on at system boot. Also, failover in this scenario is not automatic. It will involve us manually turning on the secondary VM in a failure.
Back to business… You will now see a message in the replication pane telling you that everything is OK.

Prepping for a failure
Prepping the Backup VM
Replication is working fine now… or is it? Of course we should always test our backups and know how to act in the event of a failure. I’ve uploaded a file (sample.mp4) to my VM and have manually run the replication job by clicking Schedule now in the replication pane.
Next we need to create our backup VM on S2.
Create a standard VM on S2 with the same resources as the VM on S1. Make sure to use the ZFS SR we created. The hard drive size can be very small. Even 1GB is fine.
After creating the VM, if you go to Datacenter>proxmox2>zfs-storage you will see vm-101-disk-0 in the Content tab of the center pane. This is the disk that the new backup vm is using.
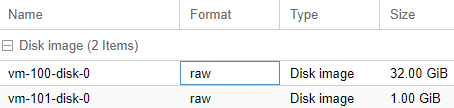
What we’ll need to do is modify the configuration file of the backup VM to point it’s config to the disk that is replicated and not the new disk that we created.
Open the console by clicking proxmox2 and selecting
Edit the config file for the vm with ID 101:
$ sudo nano /etc/pve/qemu-server/101.conf
In that file you will find:
scsi0: zfs-storage:vm-101-disk-0,size=1G
Change that to (assuming that is the name of your replicated disk):
scsi0: zfs-storage:vm-100-disk-0
Now we are ready to simulate the failure.
Simulating the failure
We now have everything in place. Let’s simulate a failure by pulling the Ethernet cable from S1.
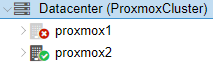
Instantly our S2 web interface will show S1 is down.
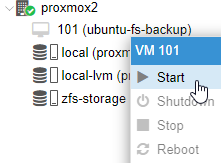
Now all we need to do is expand proxmox2 and turn on our backup vm which will boot from the last replicated hard disk image.
You may get an error saying cluster not ready – no quorum? (500):
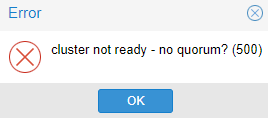
This error is coming up since there is only one proxmox server available in the cluster right now. Normally, all cluster servers would vote to start a vm. This vote is to combat split-brain issues where the proxmox server you are starting the vm on may actually be the server that is down. Since we only have a two server cluster however we can enter a command to make the minimum vote count set to 1 so that our server can vote for itself.
$ pvecm expected 1
Now let’s try to start the server and voila, it boots.
Remember that the sample.mp4 file was not originally located on my first replication image that I took however since then I’ve uploaded the file and started the replication task manually.
Sure enough when I booted up my VM I was able to access it with the same IP address and the sample.mp4 file was accessible on my file server.
Closing notes
I hope this was informative to you. It is important to remember that this is a poor man’s backup/disaster recovery. It avoids having to use shared storage and assumes that you can deal with the data loss in between replication jobs.
Please comment below if there are any changes I can make or if you have questions I would be glad to assist.

great tutorial, mucho appreciated, i was banging my head against the wall to get this to work. the proxmox documentation was very sparse on the initial creating of the zfs-pool locally and then making the zfs-storage for the datacenter. I am moving from hyperv and always try to have 2 server to replicate the VMs. I understand it’s not backup storage but has saved me a couple of times when a server has gone down. just need to failover to the replicated server at that point. many of my customers can not afford shared storage
LikeLike
0 Pingbacks