
I was having trouble finding a guide/steps to setup a software RAID 1 while in the Ubuntu installer. I stumbled upon a blog post that had the steps written out very nicely however since it was written as a comment I thought people may overlook it when they are first scrolling through search results. I will list out his steps as well as include screenshots and a bit more information.
My Setup
I will be testing on my KVM setup however all the steps below apply the same as if the server was a physical server.
I have two drives that are both 200G. I plan to have them setup in a raid1 mirror that will have a partition table like this:
tfernandez@ubuntu-2:~$ lsblk
NAME        MAJ:MIN RM   SIZE RO TYPE  MOUNTPOINT
loop0         7:0    0  69.9M  1 loop  /snap/lxd/19188
loop1         7:1    0  55.4M  1 loop  /snap/core18/1944
loop2         7:2    0  31.1M  1 loop  /snap/snapd/10707
sr0          11:0    1  1024M  0 rom
vda         252:0    0   200G  0 disk
├─vda1      252:1    0     1M  0 part
├─vda2      252:2    0     1G  0 part
│ └─md0       9:0    0  1022M  0 raid1
│   └─md0p1 259:0    0  1018M  0 part  /boot
└─vda3      252:3    0   199G  0 part
  └─md1       9:1    0 198.9G  0 raid1
    └─md1p1 259:1    0 198.9G  0 part  /
vdb         252:16   0   200G  0 disk
├─vdb1      252:17   0     1M  0 part
├─vdb2      252:18   0     1G  0 part
│ └─md0       9:0    0  1022M  0 raid1
│   └─md0p1 259:0    0  1018M  0 part  /boot
└─vdb3      252:19   0   199G  0 part
  └─md1       9:1    0 198.9G  0 raid1
    └─md1p1 259:1    0 198.9G  0 part  /
Ubuntu Storage Configuration
After booting the DVD/ISO installer for Ubuntu 20.04.2, progress through the installer until you reach the Guided Storage Configuration section.
Select Custom Storage Layout and select Done
If you have any existing partitions, delete them now by highlighting the Available Device and selecteding Reformat.
Step 1: Set your boot drives
Select the first drive and choose the option Use As Boot Device. (see below).
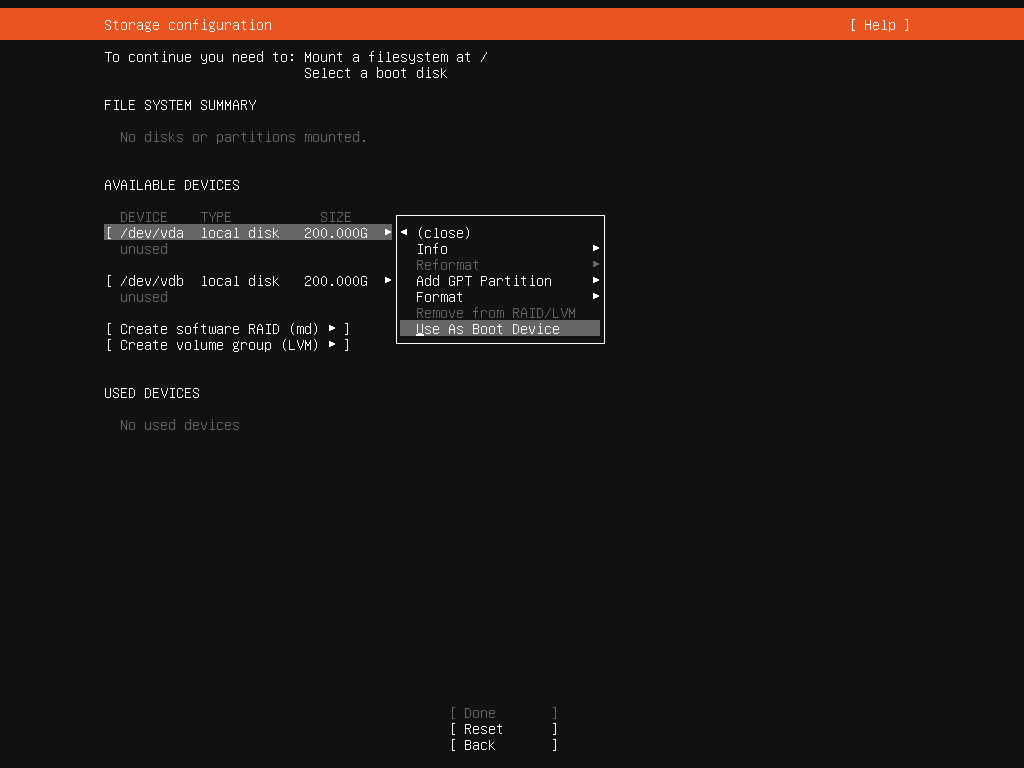
Do the same for the second drive however the option will now say Add as another Boot Device
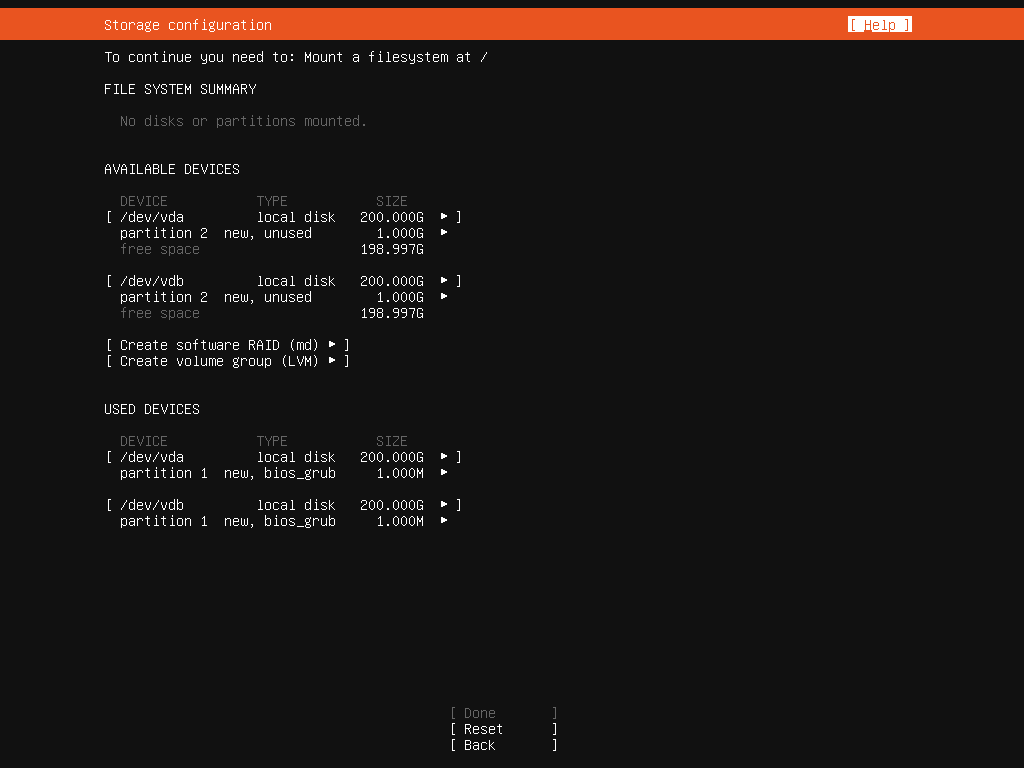
You will now have two bios_grub partitions created.
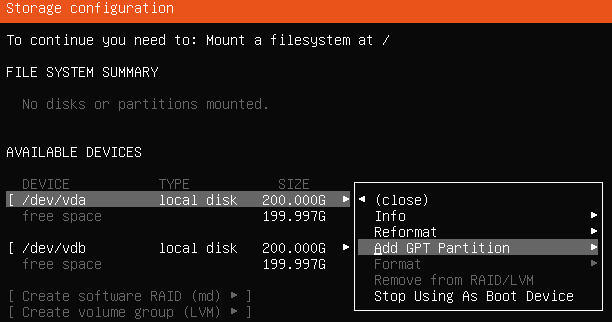
Steps 2: Creating our boot partitions
This step involves creating physical partitions on our drives however leaving them unformatted is the key.
Let’s go ahead and select your first disk and choose the option Add GPT Partition
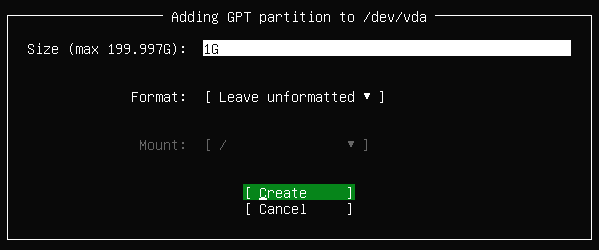
This will be our boot partition so we can set the partition to only be 1G. Ensure that it is left unformatted. Click Create
Repeat the above actions from Step 2 to create another 1G partition on your second disk.
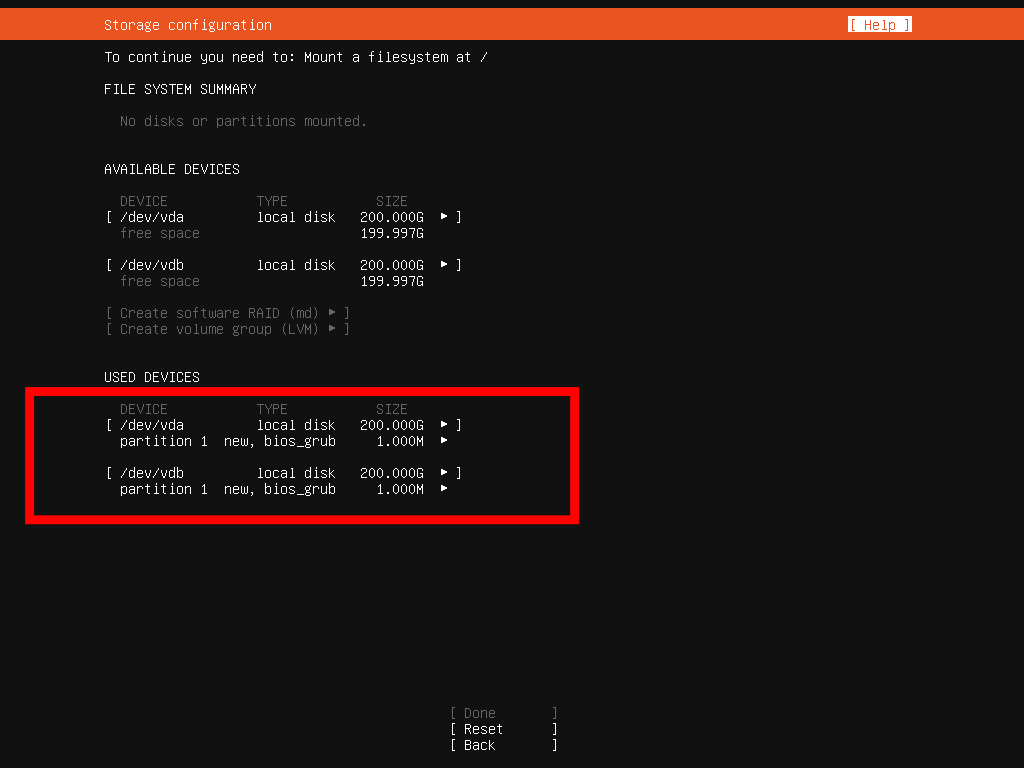
Your disks/partitions should look like this now.
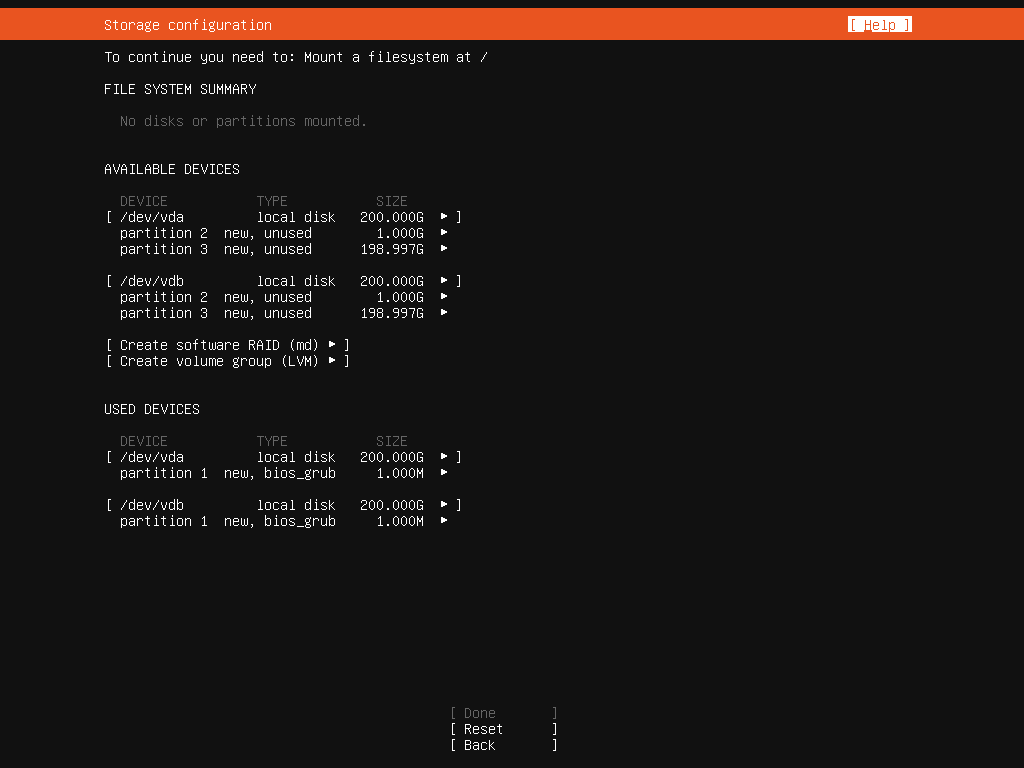
Step 3: Creating our Swap and Root partitions
The swap partition is optional really. I prefer to use a swap file since it has a bit more flexibility. Either way, you decide if it’s right for you to create just a root or both a root and a swap. The steps will be exactly the same.
Repeat the actions in Step 2 to create a swap and/or root partition. If you are creating a swap then do that first. As a general rule of thumb, the swap partition should be the same size as your amount of RAM.
Don’t forget to leave the partitions unformatted.
When you get to the root partition you can leave the size empty to use all the remaining storage.
Below is what you should see once you’ve created your partitions. Keep in mind if you created a swap then you will have 4 partitions instead of 3 like me.
Step 4: Creating our mutli-disk arrays
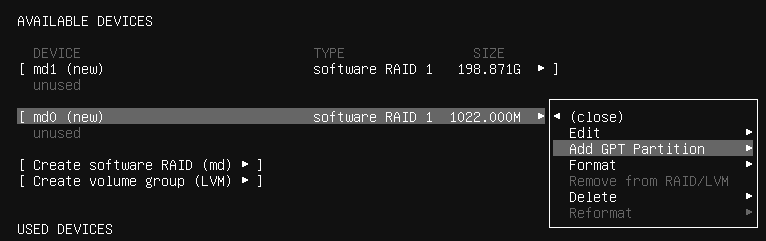
We have finally made it to the last step. Go ahead and select Create software RAID (md)
This will bring up a menu asking you to create your first multi-disk (md0). Let’s go ahead and select partition 2 on each disk. They should both be 1G. Select Create
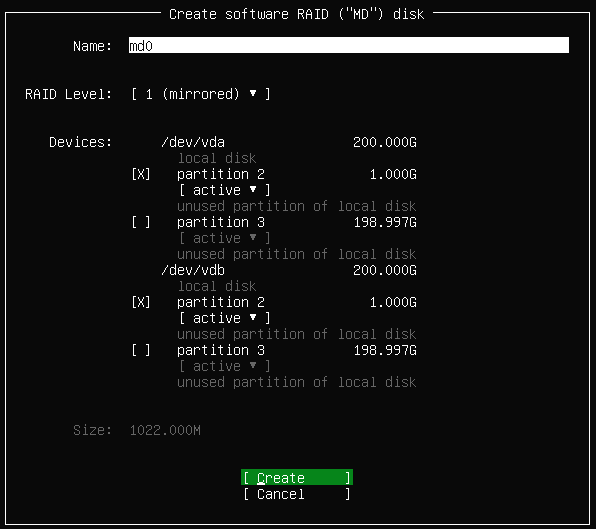
Do the same to create additional multi-disks for your swap and root partitions.
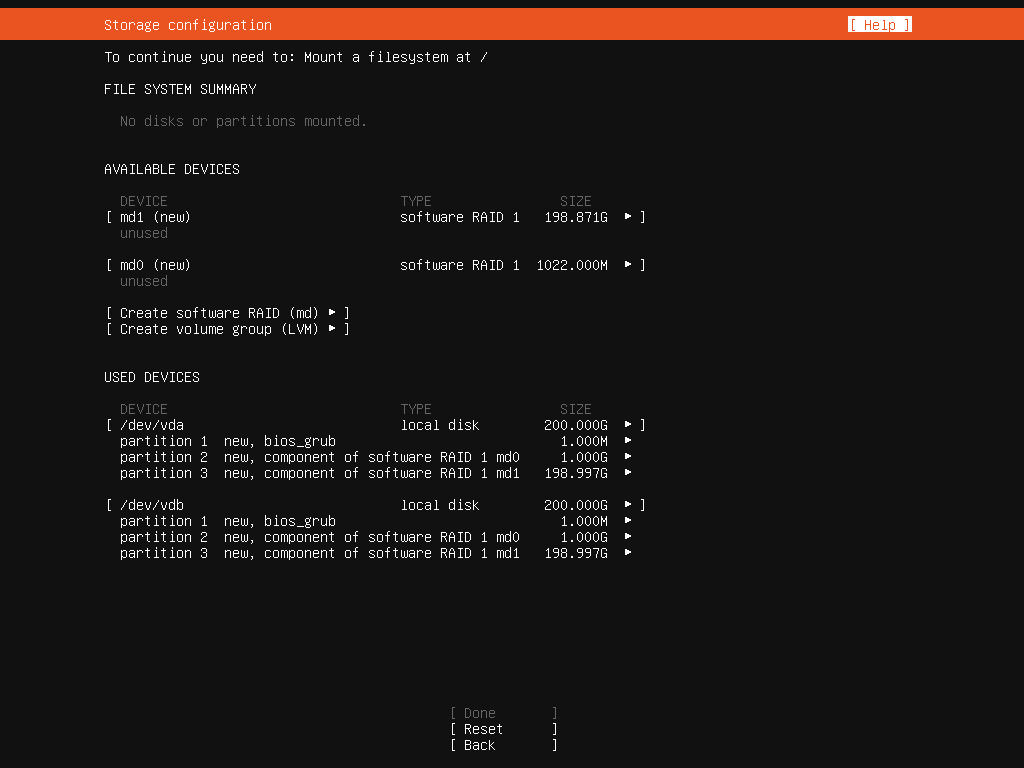
Your partitions should now look like the image below.
Step 5: Mapping /boot, /swap and / to our raid arrays
The last step in the storage configuration is to select our md devices from the list of Available Devices, format them and map them to a destination.
Let’s select md0 and Add GPT Partition
We can leave the size blank to use all available space. I will be formatting my drives with ext4 and I will be mounting my md0 onto /boot
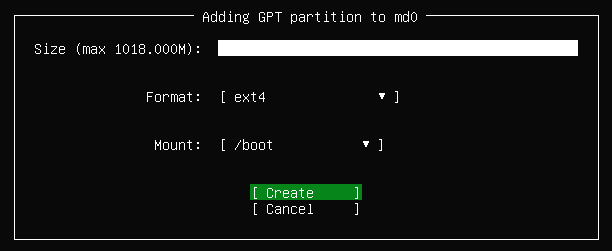
Perform the same actions to format your swap and root partitions.
Your final partition table will look something like this:
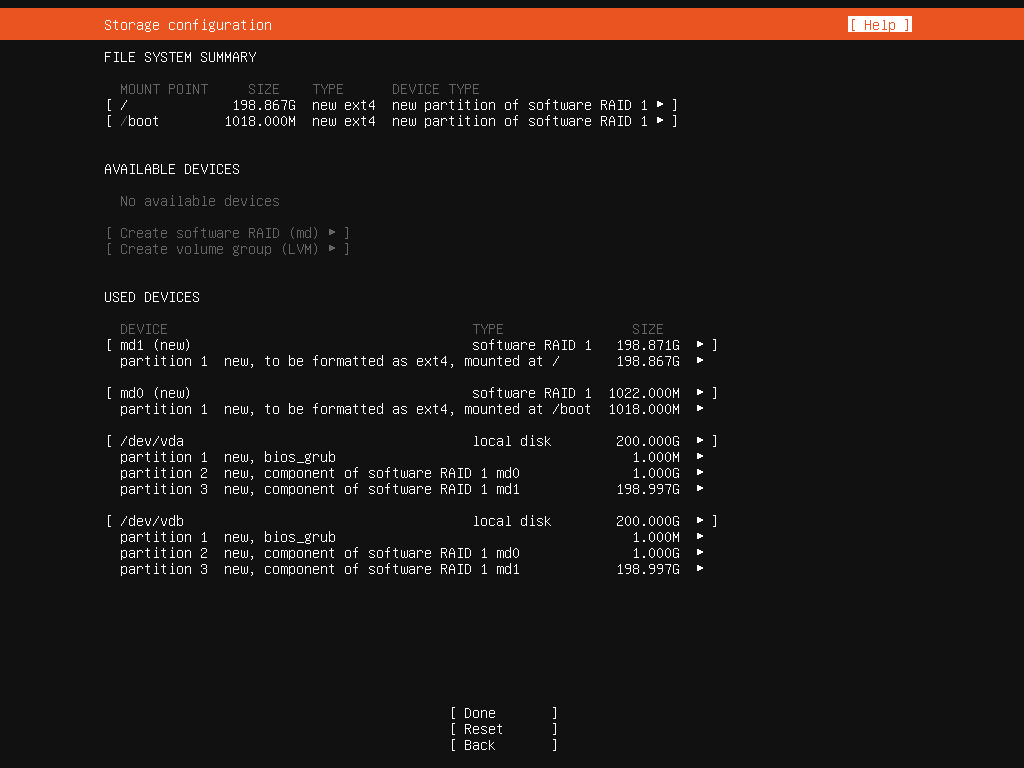
You can now select Done at the bottom of the page which will take you through the rest of the installation.
Extras
Below are some extra notes I thought I’d jot down that may or may not be useful.
Thank you this was spot on explained step-by-step.
LikeLike
thanks for your feedback, I’m glad it was helpful 🙂
LikeLike
Did you ever do a write-up for rebuilding this setup if it were to ever fail? I like how you did this but, for the life of me, I cannot find any write-up on how to repair it if it ever failed.
LikeLike
Hi Tome,
That’s a great idea! I can test pulling a drive in my lab and doing a rebuild. I’ll try to remember to message you when I do
LikeLiked by 1 person
Great question. “How to rebuild” is exactly what I’m looking for as well.
LikeLike
Tried on Ubuntu server 20.04.3, it seem cannot set both devices/drives as boot device.
For a workaround, I set one NVMe disk as boot device and manually made a similar size partition (512MB) on the other disk to align partitions.
Therefore, there is no RAID1 protection for /boot partition.
I am curious about anyone has same experience and issue/question about /boot partition?
To me, it should be a issue on Ubuntu installation.
There is no such issue on SUSE & CentOS installation on RAID1 configuration.
Asking here is because this blog post is the most detailed one on the Internet and may gather many experts here.
Thank you.
LikeLike
Hi ! Welcome to my blog.
In regards to your issue, have you deleted all existing partitions before attempting to set the drive as a boot drive?
LikeLike
Excellent article. Thank you.
LikeLike
Thanks Dan. I’m glad it was of help to you.
LikeLike
Tony, thanks for this writeup. It proved helpful to building my new firewall/container host.
I set up mirrored 1TB NVMe drives on Ubuntu Jammy 22.04 as follows:
1Gb mirrored EFI boot,
2GB mirrored software RAID 1 linux boot.
48Gb striped software RAID 0 swap for a total of 96GB swap across the two drives
880Gb in a software RAID 1 for the root filesystem in an LVM volume
First I created the EFI boot partitions, then created the software raid partitions as unformatted per your suggestion, created the software raid devices, and last set the partition filesystem formats and mountpoints.
mike@brick:/etc/netplan$ lsblk | grep -v snap | grep -v sda
NAME MAJ:MIN RM SIZE RO TYPE MOUNTPOINTS
nvme0n1 259:0 0 931.5G 0 disk
├─nvme0n1p1 259:2 0 1G 0 part /boot/efi
├─nvme0n1p2 259:3 0 2G 0 part
│ └─md0 9:0 0 2G 0 raid1
│ └─md0p1 259:10 0 2G 0 part /boot
├─nvme0n1p3 259:4 0 48G 0 part
│ └─md1 9:1 0 95.9G 0 raid0
│ └─md1p1 259:11 0 95.9G 0 part [SWAP]
└─nvme0n1p4 259:5 0 880.5G 0 part
└─md2 9:2 0 880.3G 0 raid1
└─vg0-lv–0 253:0 0 880.3G 0 lvm /
nvme1n1 259:1 0 931.5G 0 disk
├─nvme1n1p1 259:6 0 1G 0 part
├─nvme1n1p2 259:7 0 2G 0 part
│ └─md0 9:0 0 2G 0 raid1
│ └─md0p1 259:10 0 2G 0 part /boot
├─nvme1n1p3 259:8 0 48G 0 part
│ └─md1 9:1 0 95.9G 0 raid0
│ └─md1p1 259:11 0 95.9G 0 part [SWAP]
└─nvme1n1p4 259:9 0 880.5G 0 part
└─md2 9:2 0 880.3G 0 raid1
└─vg0-lv–0 253:0 0 880.3G 0 lvm /
mike@brick:/etc/netplan$ df -h /dev/nvme0n1p1 /dev/md0p1 /dev/mapper/vg0-lv–0
Filesystem Size Used Avail Use% Mounted on
/dev/nvme0n1p1 1.1G 5.3M 1.1G 1% /boot/efi
/dev/md0p1 2.0G 128M 1.7G 7% /boot
/dev/mapper/vg0-lv–0 866G 3.0G 819G 1% /
mike@brick:/etc/netplan$ swapon -s
Filename Type Size Used Priority
/dev/md1p1 partition 100593660 0 -2
LikeLike
0 Pingbacks
Top Posts & Pages